So we were shopping at the Disney Store on Tuesday and I found this beauty http://www.disneystore.com/alice-through-the-looking-gla…/…/
but it only comes for the iPhone. I have an Android. So today we
went shopping for stuff to make it with! We found gear die cuts and
gold paper (originally gift bags). Had a blast cutting out all the
gears.:D freaked out the kid because her cutter didn't like it much. oops, she needed a new plate anyway. ;)
Unfortunately, I didn't take pictures of the steps for you. But I should be able to explain it...I hope.
Items I needed:
clear cell phone case for my phone. I found this easily by googling my cell phone brand. The only problem I had is that the site selling the case did not indicate that the case I bought wasn't entirely clear. There is part of the case that is cloudy. However, for this it doesn't matter much as you can still see the design and from a distance the cloudy part isn't noticeable.
background paper. Since the original design that I was copying from Disney is white, I just used scrap white paper. The thinner the paper, the better as there is some bending required. If you have white wrapping paper that works really well.
the gears. We found these Tim Holtz gear dies at our local craft store and I had a coupon. My daughter already owns a die press although we did need to improvise getting the thickness correct (there is an adapter you can buy, but we just used an embossing folder).
I wanted to copy the gold foil look and since we couldn't find gold foil scrap booking paper we bought some gold foil gift bags instead. They were thinner and worked better. gold foil wrapping paper would have also worked for this.
The dies have tiny holes on the back to help remove the cut paper. We gently pushed the paper out of the dies with pins.
the rabbit. My daughter actually already had the rabbit stamp (go figure!) so all we needed was the gold ink stamp pad. It took a few tries to get that right but practice makes perfect.
Now for the assembly! First I popped off the back cover of my cell phone and traced it onto some thicker paper to make a template that we saved to make other cell phone case inserts. (actually, my daughter popped her cover off to make the template.) Traced the template onto the white paper and carefully cut it out, using an exacto blade for the cut outs for the camera, flash & speaker.
Carefully arranged the gears to see where everything would go, but don't attach yet as the rabbit stamp goes on first. Stamped the rabbit and then glued down the gears. Let everything dry with some weight on it so it is flat.
Then place the new cover over the back cover of the phone and place the clear case on.
Finished phone case
Friday, April 22, 2016
Tuesday, April 19, 2016
Update on Constant Snoopervision Required
When I posted http://lillyput.blogspot.com/2016/03/constant-snoopervision-required.html I had assumed that my dryer wasn't working because of a broken belt. I mean it sure sounded like the belt had broken...there was a slapping sound at first and then the drum stopped spinning.
However, when hubby took the dryer apart he realized that the belt was just fine... the problem was that, oh gosh, I don't even know what you would call the part...let's see if I can describe it. The drum of the dryer sits on rollers on the bottom and then has an axle of sorts connected to the back of the dryer. This axle looks very similar to an artificial hip joint. http://www.eorthopod.com/images/ContentImages/hip/hip_arthroplasty/hip_arthroplasty_components02.jpg
Here's a picture of the actual part and they call it a shaft. (go figure!)
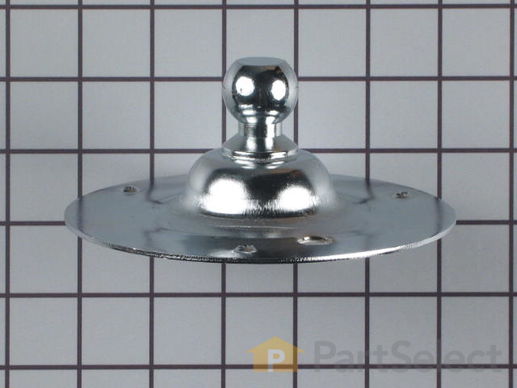 What broke was the ball from the shaft. No idea why it sounded like a broken belt. ???
So I searched for our favorite local appliance parts online and discovered that they are no longer in business. *SOB!* I had to order the part online. Not a huge deal, but we had a trip planned for my daughter's 18th birthday and wanted to have clean clothes for that.
Luckily even though FedEx Smartpost tried to give me heart failure by leaving my order in the truck for 24 hours just two hours away from my house and pushing back the delivery day by those same 24 hours...we did get the part in time and hubby was able to get it installed in about an hour & a half.
Of course our snoopervisor had to check out the package (she checks all packages coming into and out of the house now) and keep a close eye on all work. All work was approved by the snoopervisor!
I now have a running dryer! YAY! Not bad for a dryer that is going to be 24 years old this summer. note: we have not had to replace anything on the washer in all of those years. Going out on a limb of speculation here, but I assume that part of why we have had to replace some of the parts on our dryer are because the washer & dryer were in storage for 20 months back in 1999-2001. Or those parts were never meant to last this long.
At any rate I am so glad that we have these well built old machines. I am just bummed that all the kitchen appliances are not so well built and instead of just replacing a part when they go down, we have to get new ones.
However, when hubby took the dryer apart he realized that the belt was just fine... the problem was that, oh gosh, I don't even know what you would call the part...let's see if I can describe it. The drum of the dryer sits on rollers on the bottom and then has an axle of sorts connected to the back of the dryer. This axle looks very similar to an artificial hip joint. http://www.eorthopod.com/images/ContentImages/hip/hip_arthroplasty/hip_arthroplasty_components02.jpg
Here's a picture of the actual part and they call it a shaft. (go figure!)
What broke was the ball from the shaft. No idea why it sounded like a broken belt. ???So I searched for our favorite local appliance parts online and discovered that they are no longer in business. *SOB!* I had to order the part online. Not a huge deal, but we had a trip planned for my daughter's 18th birthday and wanted to have clean clothes for that.
Luckily even though FedEx Smartpost tried to give me heart failure by leaving my order in the truck for 24 hours just two hours away from my house and pushing back the delivery day by those same 24 hours...we did get the part in time and hubby was able to get it installed in about an hour & a half.
Of course our snoopervisor had to check out the package (she checks all packages coming into and out of the house now) and keep a close eye on all work. All work was approved by the snoopervisor!
I now have a running dryer! YAY! Not bad for a dryer that is going to be 24 years old this summer. note: we have not had to replace anything on the washer in all of those years. Going out on a limb of speculation here, but I assume that part of why we have had to replace some of the parts on our dryer are because the washer & dryer were in storage for 20 months back in 1999-2001. Or those parts were never meant to last this long.
At any rate I am so glad that we have these well built old machines. I am just bummed that all the kitchen appliances are not so well built and instead of just replacing a part when they go down, we have to get new ones.
Monday, April 18, 2016
Stop and enjoy the real world around you!
On the second day of our 3 day trip to Disneyland I noticed the following article online and shared it on my Facebook. http://finance.yahoo.com/news/went-without-smartphone-7-days-212218807.html
note: I did this from our hotel room...NOT while actually in the park.
I shared it because I also noticed how many people were at the park but not really experiencing the park. More than half the adults and several kids too were all busy with their cellphones instead of enjoying their vacation.
Now I can understand checking on your phone while waiting in the lines...especially if you were waiting for a character visit that wasn't even going to start for 15 minutes or more...you can only take so many pictures of the very cute duckies. (btw: we got to see 2 clutches of baby ducks while there!)
But come on people...you've paid a bunch of money for this trip...enjoy it!!!
Sigh!
Tuesday, April 05, 2016
Reinforcements Needed
I've kept a garden in the lower portion of my yard since we moved into this house in 2001. The back yard has a slope that is somewhat contained by two retaining walls. The upper wall is about 15 feet from the back porch to give you somewhat of an area to enjoy the yard...it then slopes down to the far left corner where a second wall is and then that area was never sodded and just kept as a garden. This has worked out well for us and every year I've managed to get something to grow there.
Over the past few years I've had to put up a fence around this area because my dog likes to help herself to the garden. If there are carrots, she'll dig one up for a snack. I knew that tossing my egg shells in the garden was a risk, but the fence was in pretty good shape and it was winter so I didn't think too much about it...
until yesterday
Lately Lilly who used to be happy sleeping in her bedroom until I got up each morning (for the most part) has started asking hubby to let her out. She has now been getting a small breakfast (hubby always gives her 3 pieces of his cereal) and goes outside each morning. However, she hasn't been a good girl about it and usually keeps hubby from leaving for work on time.
Yesterday, I heard the back door slam open and shut a few times and then heard the utility room sink. When I got up I discovered that Lilly was locked in her bedroom (aka my laundry room with the utility sink). The sink still had very dirty water in the bottom. So now I knew why I heard the sink...someone had dirty paws.
When I got to my computer there was a note from hubby explaining the situation to me...Somedoggy had gotten into the garden. sigh!
I had been planning on reinforcements to the garden for a while because the neighbor's bird feeder has attracted the squirrels who think that the garden must be for them and they eat all they can find. What I originally wanted to do was put a hoop house over the garden. http://www.ericsprojects.com/cpg/albums/userpics/10001/normal_DSC02244.JPG However, hubby has been pretty dead set against this idea. He doesn't care for the look of it and hasn't been all that supportive of my gardening efforts because he doesn't like vegetables so he doesn't see the point. There is also the problem that the retaining wall isn't exactly square and there are other obstacles that would need to be addressed.
While searching online for solutions to my pest problems I realized that I still had some 1/2" hardware cloth from our old rabbit pen that had been recycled...some of it never used at all. So my plan was to put the rabbit fence around the garden. Then I could use my bird netting across the top of the garden to keep the critters out.
Unfortunately, I did not know exactly how much hardware cloth I actually had and how much I actually needed. There wasn't enough to put hardware cloth on all 4 sides of the garden like I wanted. I was only able to put the fence on two sides. However, this works to keep the dog out of the garden as the sides I wasn't able to fence in with the rabbit fence are the back which has our 6ft yard fence and then the remaining side has blocked access and I put up my old plastic fencing as a temporary fence until I can get more hardware cloth. Now I just need to go take some measurements to see how much more I need.
While I am at it, I want to try planting potatoes in containers this year. I've been watching gardening videos and having containers for the potatoes appeals because when it is time to harvest...all you have to do is dump out the container and sift through the dirt. The dirt can be reused and the potatoes don't get damaged from a shovel or pitch fork. Cool!
Subscribe to:
Posts (Atom)